Introduction
In part one of this series you configured your OpenSaaS account and created a basic template site.
In this part of the series we’re going to select a base template and then tweak the template site to lock down permissions and remove menu items that are not suitable for your customers.
Select a Template
In part 1 we did not apply a design to the template site – so at this point it’s very bare bones. Let’s fix that now.
- Navigate to APPEARANCE → KADENCE → STARTER TEMPLATES
- Scroll down and locate either the HANDMADE SOAP STORE (SOAP SHOP) or the HANDMADE JEWELLERY COLLECTION (JEWELRY SHOP) template
- If you can’t readily locate the template, use the CTRL-F (find) key-combination to search for the words “SOAP” or “JEWELRY” on page
- Click on the template and in the subsequent screen click the FULL SITE button on the bottom
- In the popup, enable the toggle to DELETE PREVIOUSLY IMPORTED POSTS AND IMAGES
- Ignore the SUBSCRIBE AND START IMPORTING button and, instead, click the tiny link at the very bottom of the popup SKIP, START IMPORTING.
The reason we’re choosing one of these sites as the template is because they install WOOCOMMERCE which auto-installs a user role we’ll use later.
Now, you can choose to install any other template to overwrite this one. The template you choose is the one your customer will see when they purchase your product.
For example, if you’re targeting Dentists, Doctors or the general Medical profession you should install the DENTIST template. If you’re targeting one of the TRADES such as construction, electrician, roofing etc. you should install the ROOFING template. Etc. Etc.
After you’ve selected your template you can modify it as you see fit for your target market needs.
Permissions
We’re going to remove some things that we would not want our customers to access. This includes the PLUGINS and THEMES menu options so that customer cannot upload new plugins and themes nor activate and deactivate existing plugins and themes.
To make this happen we’re going to create a new ROLE and then assign the new role to a new user. The role will allow the new user to have semi-admin privileges.
To create a new role, install the USER ROLE EDITOR plugin on the template site. The free version from wordpress.org should be enough for what we’re looking to do.
Once installed, go to USERS → USER ROLE EDITOR. Then, click the ADD ROLE button on the right side of the screen – this will popup a dialog box (see image below).
Give the new role a name such as opensaas_customer_admin and choose the option to make a copy of the SHOP MANAGER role.
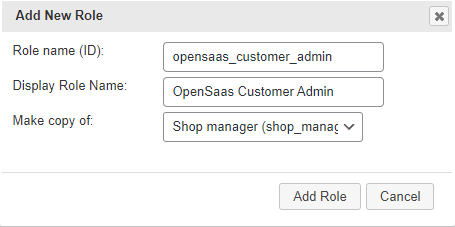
Then, click the ADD ROLE button.
We are using the SHOP MANAGER role as the role template for the new role because it is already configured with most of the permissions we need for the new user.
New Customer Admin User
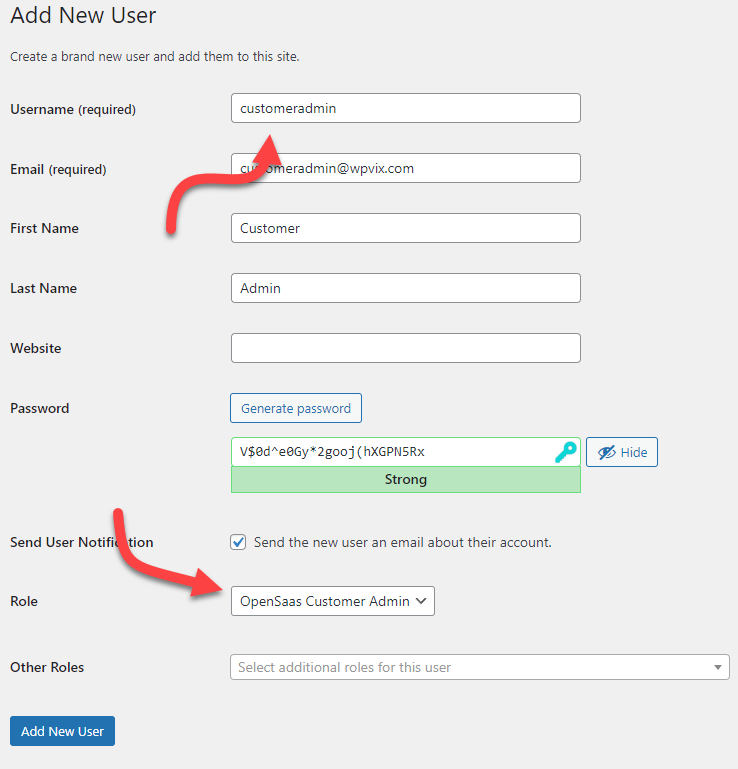
Now, go to the ALL USERS screen and add a new user by clicking the ADD NEW button at the top of the list. Give them the user name customeradmin and assign the OPENSAAS CUSTOMER ADMIN role you created earlier.
The customer profile form should look similar to the following:
Now, switch browsers and login to your template site using this user name. You will notice that many menu options are no longer present. There are still some menu options that you would not want but we’ll handle those later.
If you dig into menu options like THEMES, you’ll notice that you can’t add themes but you can customize the currently active one.
When you look in the users list you’ll see that the original ADMIN user is missing – this new user does not have permissions to update users with the ADMIN role.
Update The Customer Admin user for New Purchases
Currently, when a customer makes a purchase and gets their new site/app they are assigned the Administrator role and user. This needs to change so that the Customer Admin user is the one that is changed and communicated to the purchaser.
This is done in the OPENSAAS Template Site record.
Update Template Site
- In your OpenSaaS admin area, go to OPENSAAS → ALL APPS
- Scroll down to your template site and click on the title / domain to edit it
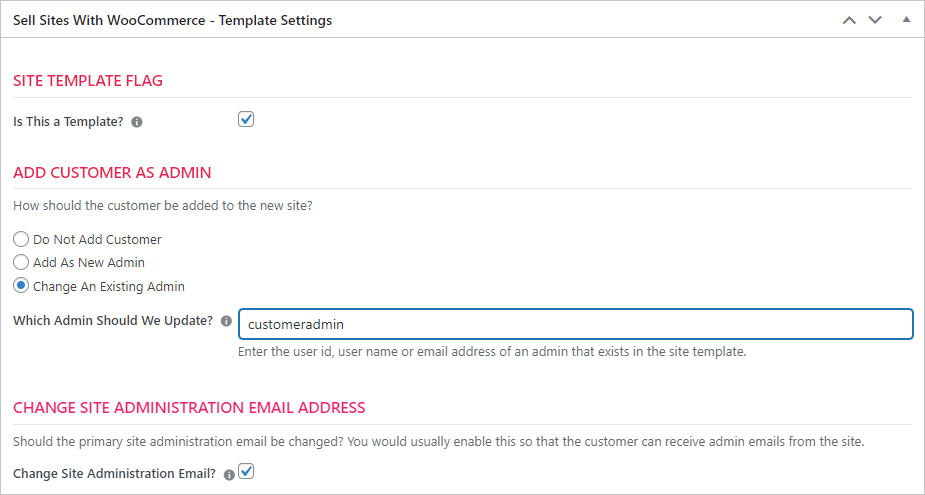
- Scroll down to the box titled SELL SITES WITH WOOCOMMERCE
- Make sure the option CHANGE AN EXISTING ADMIN is selected and enter the user name you created earlier – customeradmin
- Click the UPDATE button in the upper right to save changes.
Remove Additional Menu Options For Customer Admin
Even with the permission changes above there are still some stray menu options that should be removed. To handle this we need to install ADMIN MENU EDITOR PRO on the template site. This is a PREMIUM plugin. While there is a free version available, the features you’ll need are only present in the PRO version.
At the time of this writing, a 1 year license was $63.00 and a lifetime license was between $95 and $383.
Once installed and activated you can access it by going to SETTINGS → MENU EDITOR PRO.
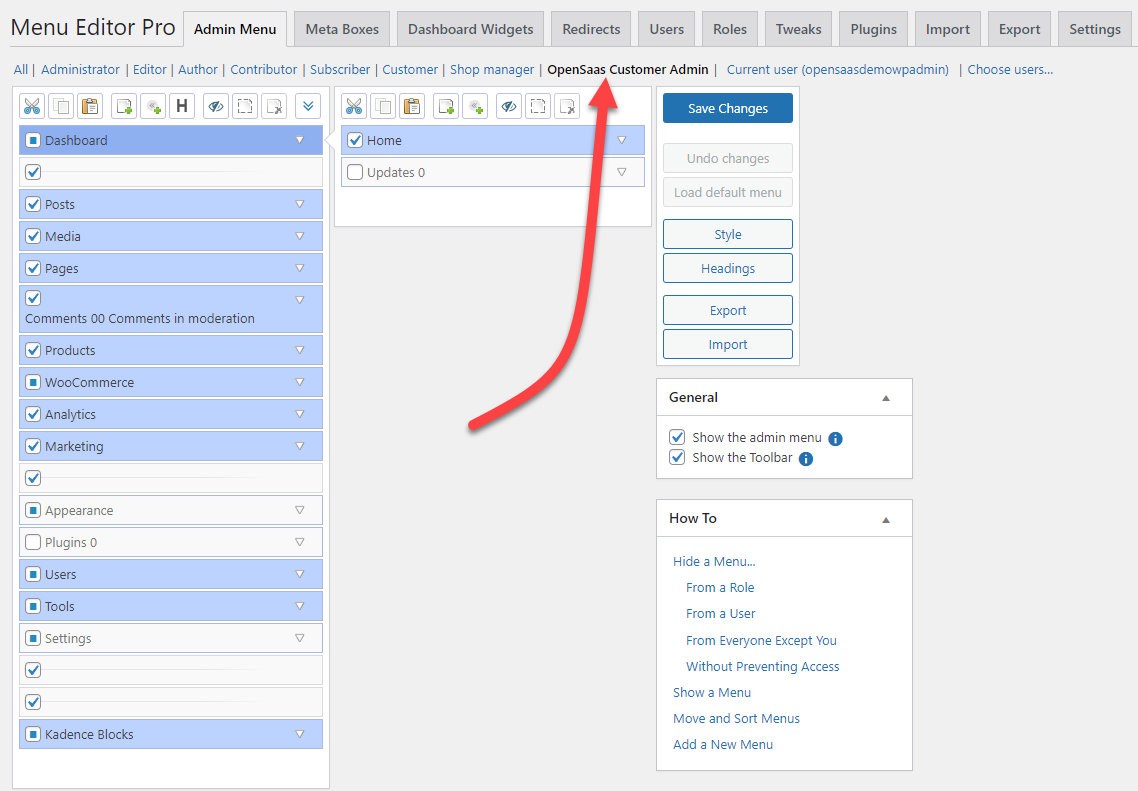
The user interface is kinda funky but after messing around with it you’ll get used to it.
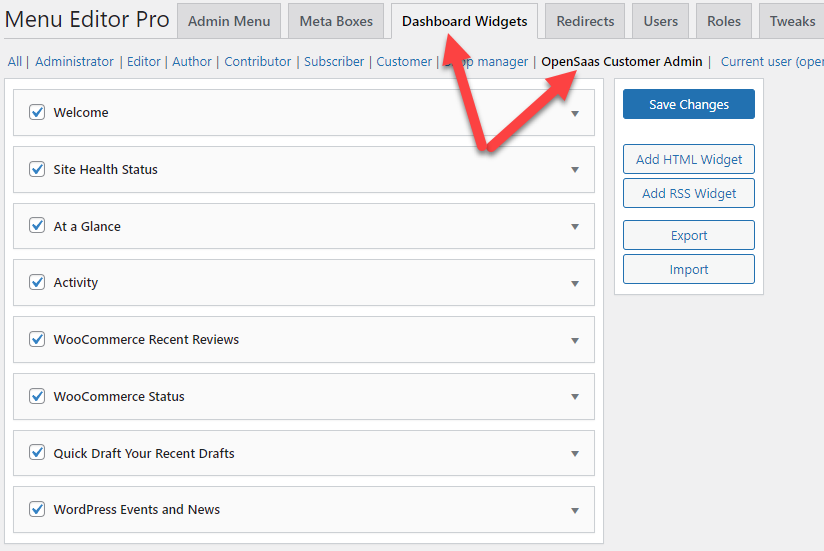
The most important thing is to make sure you’re always making changes for the correct role – in this case our new OPENSAAS CUSTOMER ADMIN role. Make sure you click on it at the top as shown in the image above (You will need to make this selection every time you switch tabs and it’s very very easy to forget to do this!)
After selecting the OPENSAAS CUSTOMER ADMIN role, go through each of the menu options shown on the left and uncheck anything that you don’t want to be shown.
For the purposes of this tutorial, we will uncheck the following items:
- KADENCE BLOCKS
- APPEARANCE → THEMES
- APPEARANCE → KADENCE
- APPEARANCE → KADENCE → STARTER TEMPLATES
- TOOLS → IMPORT
- TOOLS → EXPORT
Don’t forget to click the SAVE CHANGES button.
Then, go through the purchase process again and verify that the CUSTOMER ADMIN login for new sites do not show those menu items.
Tweak The WP-ADMIN Dashboard
Since we’re working with MENU EDITOR PRO, let’s fix some things in the wp-admin dashboard. In particular, we should remove the following metaboxes:
- At a glance
- Activity (you might want to keep this for your customer but we’ll remove it for this tutorial)
- Quick draft
- WordPress events and news
To do this, click on the DASHBOARD WIDGETS tab and then click again on the OPENSAAS CUSTOMER ADMIN role
Next, uncheck the metaboxes that you don’t want to appear for your customers:
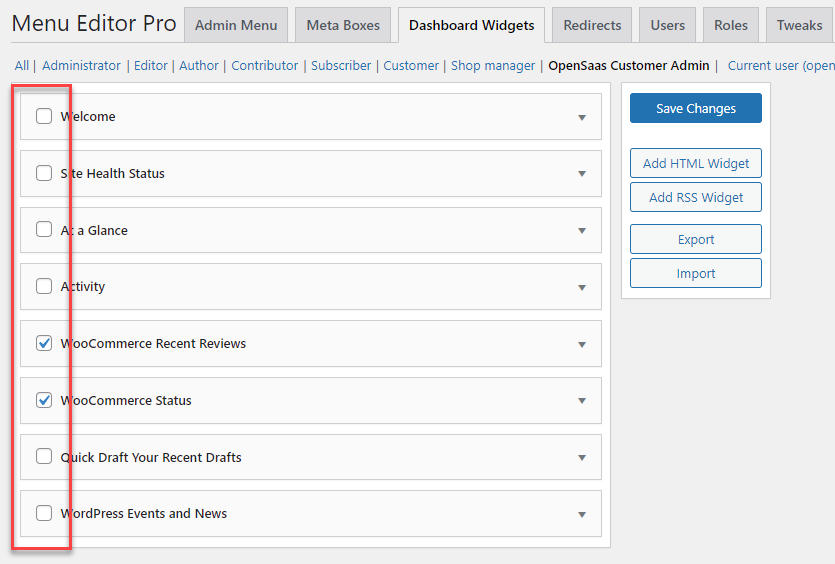
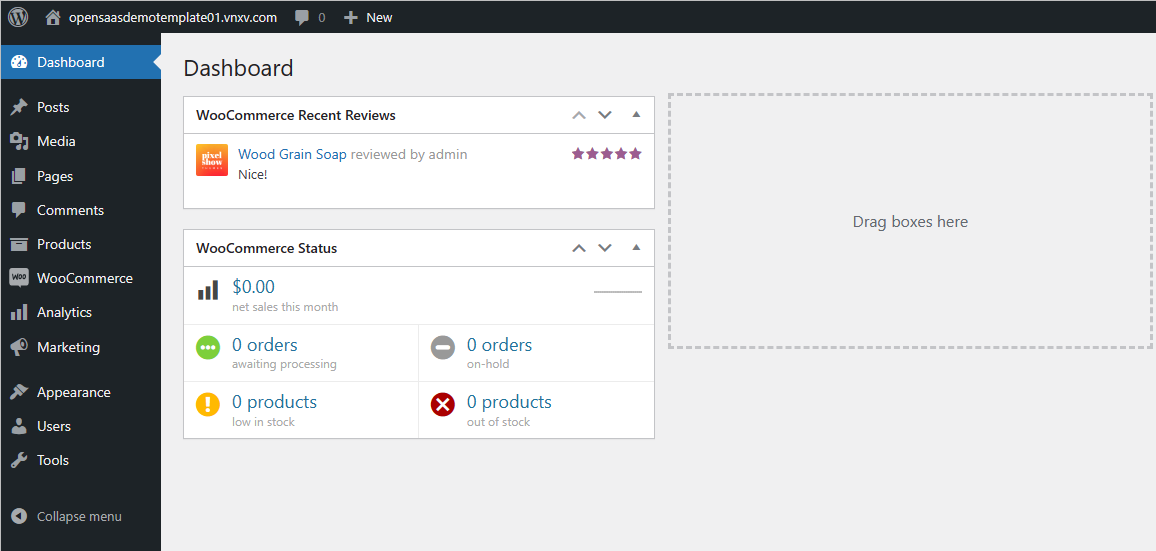
In the image above you can see that we’ve unchecked almost everything. Don’t forget to click the SAVE CHANGES button! Now, when a customer purchases an app/site they will log in and experience a relatively clean dashboard.
Minimum Viable Product
At this point you pretty much have a minimum viable product with permissions locked down so that your customer can’t inadvertently destroy their site or get to sensitive data.
With an MVP you will still have to manually configure some things for your customers – aka White Glove service. But they will be able to purchase your product and start using and configuring it right away – which is the goal of an MVP.
Your “White Glove Service” Checklist
When your customer purchases your MVP, you will have to log into their new site as an admin and perform some setup tasks for them. Among these are the following:
- Activate the KADENCE license for the new domain
- Activate the MENU EDITOR PRO license for the new domain
- Configure an SMTP plugin so the site can send emails
- Configure backups
- Add the site to your SITE MANAGEMENT tool (eg: MAINWP, MANAGE WP REMOTEWP etc.)
As your business grows you will likely be able to afford the development costs required to automate these tasks.
Pricing Your MVP
If you haven’t thought about it yet, you should consider how to price your MVP given that you will likely expend an hour or so on each site to handle the “White Glove” services mentioned above.
Some folks charge a one-time setup fee to account for this while others have aggressive up-sells in the wp-admin dashboard and menu area.
If you opt to use a setup-fee, you can eventually lower it or eliminate it altogether as you progressively automate each task.
Wrapup
This is the end of part 2 of this series. We’ll update it in the future to add the link to part 3 when that is complete.
At this point you should know enough to:
- Create a template site
- Lock down the template site
- Create a product in your WooCommerce store that deploys the template site (your MVP)
Bonus Section: Allow Your Customer To Choose Their Own Kadence Template
If you want to allow your customers to choose their own KADENCE template, you need to modify the OPENSAAS CUSTOMER ADMIN role and update MENU EDITOR PRO to allow the role to see the KADENCE TEMPLATES menu option.
Modify the Customer Admin Role
- Navigate to USERS → USER ROLE EDITOR in the Template Site
- In the drop-down list of roles at the top of the page select the OPENSAAS CUSTOMER ADMIN role
- Scroll down and locate install_plugins in the right hand pane. Then, enable its checkbox – this allows KADENCE to add any required plugins when logged in as the customer (who is not a full admin.)
- Scroll down and locate update_plugins in the right hand pane. Then, enable its checkbox – this allows the KADENCE plugin to update any outdated plugins.
- Click the blue UPDATE button on the upper right side of the screen.
Add Back The KADENCE menu options
- Navigate to SETTINGS → MENU EDITOR PRO in the Template Site
- Click on the OPENSAAS CUSTOMER ADMIN link at the top of the screen (this ensures all changes apply only to that role)
- Click on the APPEARANCE menu option in the menu list
- In the submenu that appears enable the STARTER TEMPLATES checkbox
- Click on the blue SAVE CHANGES button
Now, when your customer logs into their new site, they can use the APPEARANCE → KADENCE → STARTER TEMPLATES menu option to load up their own preferred template. Of course, they’ll then see a lot more of the KADENCE brand.
In part 3 of this series we’ll discuss techniques that can reduce the number of instances where 3rd party brand elements are shown.
Note: Despite these new permissions, users will not be able to navigate to the add-plugins screen.
Request a Demo
Want to see OpenSaas.io in action? Request a demo - just pick a time from our calendar.